Spontaneous Ceiling Collapse

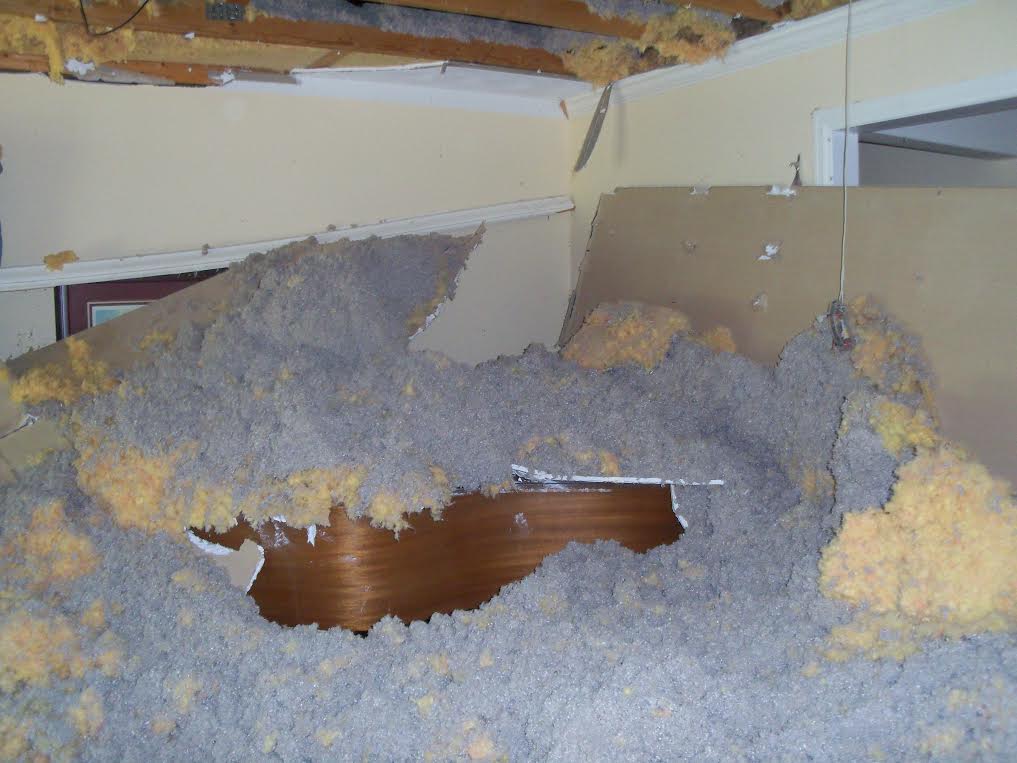
Are You at Risk for Sudden Ceiling Collapse ?

Sudden ceiling collapse is dangerous situation that can not only damage the contents of your room but can also cause serious injury or even death. This phenomon should definitely be a concern for anyone whose house was built between 1960 and 1980 especially if it was built during the 1970s. We have been seeing an ever increasing number of ceilings that suddenly fail sending hundreds of pounds of drywall, plaster and insulation falling to the floor. The following information explains why these ceilings are collapsing and how to tell if your ceilings are about to fail. You will also learn how it can be prevented and what it takes to repair them.

I personally have no doubt that one by one each and every one of these ceilings is a potential disaster just waiting to happen. You have two choices if you own one of these homes. You can either replace the ceiling when you can see it failing or falls, or you can be proactive and fix it before it before it begins to fail. Homeowners who wait till they can see the ceiling is actually failing will be paying a lot more money than those who proactively prevent it.

sutter 3

This picture shows a ceiling that collapsed as the homeowner watched. It was a slow motion collapse taking about 2 minutes for the entire thing to come down. You can see a baby grand piano now all scratched up and buried under insulation. You can tell the difference between the old and new blown in insulation by the colors. Notice how an entire sheet of dry wall fell against the wall as the ceiling collapsed. parts of the fallen drywall where it fell against the wall.

sutter ceiling 1

This picture shows the entrance where the picture of the piano was taken from. Notice how a 50 lb piece of plaster covered drywall is hanging in the doorway. The only thing holding that piece up is the fiberglass mesh joint tape embedded in base coat plaster where the ceiling meets the wall. This demonstrates how strong plaster is as joint compound would not have had the strength to do this.

Why Ceilings Suddenly Collapse

Starting in the 1930s and into the late 1950s the standard technique for plastering homes involved the installation of Rock Lathe, a 2 foot wide by 4 foot long piece of sheet rock, to your ceiling joist and wall studs by using small nails. The rock lath was then covered with a 3/8 inch thick layer of scratch coat plaster after which a thinner coat of finish plaster was applied. Beginning in the 1960s several changes to the construction industry started to occur that are now resulting in Sudden Ceiling Collapse. The use of Rock Lathe was quickly being replaced by 4 foot by 8 foot drywall. The spacing of ceiling joist went from 16 inches to 24 inches apart meaning there are fewer fasteners (nails) per square foot.
During this time period it was acceptable to install drywall by nailing it into place. There were two types of nails used, one was a smooth nail and the other was a small shank nail which contained small ridges encircling the shaft. When installing drywall with nails the head of the nail must be indented /dimpled into the drywall to ensure the drywall is tight to the wood. Unfortunately when the hammer hits the nail hard enough set the nail head below the surface of the drywall the gypsum which makes up the core of the is crushed thus weakening the drywall. Today almost all building codes require screws to be used instead of nails. Another issue is that the insulation standards in those days required less insulation then is recommended now. With the ever increasing cost of energy over the last several decades people have been putting more blown insulation on top of the older insulation to try and control the cost of heating and cooling their homes. The stage is now set and here is what is occurring to cause these ceilings to collapse.
Just like everything else temperature and humidity fluctuations cause your house to swell and shrink and over time this movement causes the hammer impacted weakened drywall to further weaken. Other stresses on your house can also change as it settles due to the ground shifting around your house from freezing or because it is on or near a hill and ground creep occurs. The humidity also causes the nails to slowly rust and become thinner. Another issue that has greatly accelerated the rate at which these ceilings fail is that the recommended depth of insulation has increased and thus the amount of weight on top of your drywall also increases. The following information is directly from the biggest drywall manufacture’s technical manual.
The manual is: The Gypsum Construction Handbook, Centennial Edition/5th Edition Copyright 2000
Page: 75, last paragraph titled “Ceiling Insulation” states the following weight limits to prevent ceiling sagging between joists.

Joist spacing

16 inches apart

24 inches apart

24 inches apart

24 inches apart

Drywall thickness

1/2 inch

5/8 inch

5/8 inch

3/8 inch

Insulation weight limits

2.2 lbs per square foot

1.3 lbs per square foot

2.2 lbs per square foot

Do not use unsupported insulation.

While These weights are not failure point weights it is important to note that even at these lite weights it is enough to cause the drywall to warp resulting in visual sagging, however even at these lite weights it can becomes a much bigger problem for these older ceilings because nails were used. When ceilings fail and fall to the floor one of two things have occurred or a combination of both. When those ceilings that were installed using a smooth nail fall it is very common for the nail to actually pull out of the wood joist, even if they are not thinned due to rust. Ring shank nails will also pull out of the wood because the little ridges rust away effectively making the nail thinner than the hole. This happens because as the joist expand and contract from temperature and / or humidity so does the hole and the weight of the ceiling slowly pulls the nails out. Failed ceilings where the nail is still in the joist fell because over time a combination of the ceiling weight and the expansion and contraction of the drywall and wood joist slowly pull the nail through the weakened drywall. The next question is how much does insulation weigh when it comes to blown in insulation? That all depends on the type of insulation used. Blown in insulation has a tendency to settle or compact and frequently has had additional insulation blown in on top of the the original layer and thus can be difficult figure out. One way to get an accurate measurement is to go into the attic and section off a a 16 inch or 24 inch section using card board, scoop it into a bag, weigh it then work the math to find out weight per square foot.

Just How Bad Can it Get ?

Drywall will warp can warp significantly if it is a slow process, as a matter of fact if you wet it and place it over a barrel you can actually create some very big curves and when it dries use it on round walls. I can not begin to tell you how many ceilings I have repaired where there is not a single nail holding up the ceiling. I have seen them hang as much as 6 inches in the middle of the room without falling and the only thing holding the ceiling up was the fiberglass mesh joint tape in the middle of the ceiling and the walls at the edges. Ceilings like this, when they do fall, come down in a matter of second or two and can cause serious injury or even kill someone.

Falling ceiling braced cut 1 darkened

The only warning this homeowner had that her ceiling was about to fail was a steady but widely spaced out set of cracking sounds over the course of several days. The insulation was sucked out and half of the ceiling has been removed. You can also see the emergency bracing that was installed to keep it from falling until work could be started.

falling ceiling cut screwgun perspective 4 darkened

Same ceiling demonstrating just how far the ceiling can sag and yet not fall. Notice the screw gun fits easily between the drywall and the joist. The entire ceiling except for where it met the walls was hanging like this.

Proactive Prevention of Sudden Ceiling Collapse

One of two methods is used to proactively repair these ceilings. The first and cheapest technique is to rescrew the ceiling using special ceiling buttons, paint on a bonding agent and then replaster using a two coat plaster technique. If during the rescrewing process if nail pops occur a hydraulic jack must be used to ensure that the ceiling is tight against the joist. However if it is sagging exceeds a quarter inch and or we can hear the drywall cracking wood furring strips should be screwed over the drywall to the ceiling joist and new drywall installed to these furring strips before it can be plastered.

Repairing a Failed Ceiling

First we have to come in and put in braces to prevent the ceiling from falling. Next an insulation company has to be called in to suck all the insulation out of the ceiling and dispose of it because it cannot be reused. Then we have to carefully remove the ceiling piece by piece and reinstall new drywall. The insulation company comes back in and blows in new insulation and then we plaster the drywall. When we have to remove the old ceiling the upper corner of the walls are frequently damaged or force us to plaster down the wall 4 to 6 inches causing a slightly visible patched look on the walls.

Inspecting Your Ceilings

There are several things to look for such as cracks and/or nail pops. If you can see small round dimples (about the size of a shirt button) scattered along a straight line it is a sign that your drywall is pulling away from the nails thus the dimples. . Because drywall can warp significantly and the fact that nails can pull through the drywall without causing a hole or dimple in the overlying plaster these visual clues may not be present. People even report hearing the occasional popping or cracking sound prior to failure with no visual clues being seen. The absolute best way to check your ceilings is to go into the attic and see if you can slide something between the ceiling and the joists. Some other ways to check to see if your ceiling is about to fail is to measure the height of your ceiling where it meets the wall and then measure the ceiling height in several other areas in the middle of the room. You should suspect a problem if you find a measurement difference of a quarter inch. If it is a half inch or more you can be almost assured that your family is in danger. You can also try tightly stretching a string from one side of the room to another and see if there are low spots anywhere in your ceiling. You can also push up on the ceiling and see if it moves but remember ceilings are heavy and it takes some strength and experience to catch it this way.